Using Unit and Equation Var Fields
This is an updated version of a PDF document of the same name that’s distributed with both the SWE and SCE products. We now provide it in an online form, as given in this post.
1.0 Introduction
A key and unique feature of both the Signal Wave Explorer and Signal Chain Explorer are the ways they allow you to enter values for circuit parameters. Both products have a common GUI elements for this purpose, called Unit Var Fields. Specifically designed to handle unit-based values, these fields can also have decimal exponents and metric exponents.
Being able to easily handle units and exponents when entering values is a great time saver. But there’s another feature built into Robust Circuit Design’s products than also saves time: The ability to solve reversible, canned equations using Equation Worksheets while figuring out what parameter values to use. These worksheets are comprised of elements called Equation Var Fields, and are extensions of Unit Var Fields. In this post we explain how to work with both of these unique and useful GUI elements.
2.0 Unit Var Fields
Figure 1. Example of a Unit Var Field
A Unit Var Field is a labeled, coupled, text entry box and combo box that represents a number with units. The edit box displays the number, the combo box displays the units and a scaling prefix. In the example here, the field represents a capacitance of three pico-farads (pF).
Changing a field value consists of two steps: Entering a new value, and then entering a scaling prefix and/or units. To enter a new value, type the number into the text box and press Enter. If you enter a number without specifying any scaling prefix or units, then the existing scale and units currently selected in the combo box will be used. Figure 2 below shows an example of entering a new value of 47.53, keeping the same pF units as before.
Figure 2. Typing a new number into a unit var field (before pressing Enter.)
TIP: Clearing the previous number. It’s often convenient to clear the text field before typing a new number. There are two ways to do this: (1) Press CTRL-A while the field is currently in focus. This selects all the text. Then the next character you type will replace all that text, or you can simply press the Delete key to clear the existing text. (2) You can also select all the text by double-clicking the text field with the mouse. Depending on the type of text field, it may require additional clicks for the entire field text to be selected. You’ll have to experiment. Or just use CTRL-A method. It works most if not all the time.
There are several ways to associate units and/or a scale with the number. One way is to left-mouse-click on the Units combo box and choose from the selections presented. An example is shown in Figure 3.
WARNING: Using right-mouse-click, as opposed to left-mouse-click, has completely different semantics, as explained in Section 2.4. Be aware of which button you are using.
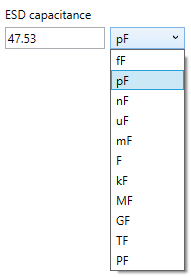
Figure 3. Using the units combo box to select a new metric prefix.
In general, a Unit Var Field can only work with one type of unit, such as Farads above. All you can change with the combo box is the metric prefix. Metric prefixes are powers of ten, in multiples of three, such as milli (\(\displaystyle {{10}^{{-3}}}\)), micro (\(\displaystyle {{10}^{{-6}}}\)), nano (\(\displaystyle {{10}^{{-9}}}\)) and so on. Table 1. gives a list of the metric prefixes supported, as well as their corresponding single-letter short-hands:
Table 1. The supported metrix prefixes
| Metric Prefix | Single letter short-hand* | Value |
| femto | f | \(\displaystyle {{10}^{{-15}}}\) |
| pico | p | \(\displaystyle{{10}^{{-12}}}\) |
| nano | n | \(\displaystyle{{10}^{{-9}}}\) |
| micro | u | \(\displaystyle{{10}^{{-6}}}\) |
| milli | m | \(\displaystyle{{10}}^{{-3}}\) |
| (None) | <empty> | \(\displaystyle{{10}}^{{0}}\) |
| kilo | k | \(\displaystyle{{10}}^{{3}}\) |
| Mega | M | \(\displaystyle{{10}}^{{6}}\) |
| Giga | G | \(\displaystyle{{10}}^{{9}}\) |
| Tera | T | \(\displaystyle{{10}}^{{12}}\) |
| Peta | P | \(\displaystyle{{10}}^{{15}}\) |
(*) The single letter short-hands are case sensitive. Lower case p is \(\displaystyle 1\times {{10}^{{27}}}\) times smaller than upper case P! Likewise, lower case m is \(\displaystyle 1\times {{10}^{9}}\) times smaller than upper case M.
WARNING: In case you missed the fine print, it’s worth repeating: The metric prefixes are case-sensitive. Lower case “p” and upper case “P” are 27 orders of magnitude apart. Don’t be fooled!
You can also enter a new metric prefix using the keyboard. Just include the prefix right after the number. You can use a single letter for the prefix as shown in Table 1, or you can spell out the full name of the prefix if you prefer. Figure 4. illustrates both ways. Spaces between the number and prefix are optional. After entering a value and any prefix, the units combo box will reflect the change as soon as you press Enter.

Figure 4. (a) Entering a single letter, or (b) entering the full prefix, and (c) final result in either case, after pressing Enter.
Along with the scaling prefix, you can also enter the kind of units after the prefix. The units can be spelled out in full, (such as “Farad”), or with just a single letter, (such as “F”). Here is the example from Figure 4 modified by having the units entered explicitly, two different ways:

Figure 5. Entering the unit type, both (a) spelled out completely, and (b) with shorthand units and prefix. (c) The result in either case, after pressing Enter.
Table 2. gives a partial listing of the single-letter unit short-hands available. (Others will most likely be added in the future.)
Table 2. Some of the supported unit type short-hands
| Units | Single letter short-hand*,** | Interpretation |
| Ohms | O,R | Resistance |
| Farads | F | Capacitance |
| Henries | H*** | Inductance |
| Hertz | H*** | Frequency |
| Volts | V | Voltage |
| Amps | A | Current |
| Meters | m**** | Length |
| Seconds | s | Time |
| Multiplier | X | Multiplier |
| Decibels | d, dB | 20 log10(ratio) |
(*) As a general rule, for those unit types not shown in the table, you can use the first letter of the units as a short-hand.
(**) Unlike the metric prefixes, the units types are not case sensitive.
(***) You might think there is an ambiguity between H for Henries and H for Hertz. Don’t worry. The Unit Var Fields are context-sensitive, and the program will know what you mean. That is, if you are on an inductance field, H will be treated as Henries. On a frequency field, H will be treated as Hertz.
(****) There is, however, an ambiguity for meters than will be explained shortly.
WARNING! In case you didn’t read carefully, even though the unit types themselves are not case-sensitive, the metric prefixes are very much case-sensitive. We repeat, pico and Peta are 27 orders of magnitude apart. Don’t be fooled!
Here are some valid examples of entering units for pico-Farads (don’t type the quotes): “pF”, “pf”, “pFarads”, “picoFarad”, “pico Farads”, “pico farad” and so on. You can use both singular and plural forms. The plurality is ignored.
To be consistent, it’s probably best to use the appropriate case for the metric prefix, and then uppercase for the unit type. For example, “pF” is the preferred form. That’s because the units are displayed this way in the units combo box. However, typing “pf” is easier (no shift key needed), so we’ve made sure that works fine too. Just don’t say “Pf” or “PF” unless you really meant to say “peta Farads”. (We really doubt you did.)
Sidebar: Why allow the entry of unit types if in fact they can’t be changed?
As you’ve seen, you are allowed to enter values into a Unit Var Field that, for example, stores capacitance values, using text like “1uF”, “42 pF”, and so forth. What you can’t do is type in something like “44 nH” in its place. That is, you can’t magically change the units of a capacitive field into Henries. You will in fact get a parsing error.
So why bother allowing the unit types to be entered at all?
There are two reasons:
- Some Unit Var Fields do allow you to change units. Well, sort of anyway. Examples are fields that represent ratios. You can using an “X” shorthand letter to mean “linear multiplier ratio”, or you can use “dB”, which is also a form of ratio, just in logarithmic form. In this case if you also enter a metric prefix, it will not be stored as such, but rather, displayed using an equivalent tens exponent. You’ll see examples of this later.
- By allowing you to enter the unit type along with a scaling prefix, it can actually make your life a little easier. When reading off a datasheet, for example, if you see “42 pF” and want to enter that value, you may naturally want to type in the extra letter “F” as a matter of course, even if you don’t really need to. We accept the value either way — as long as the field really is for capacitance. The program tries to honor what you want without getting in the way.
Ambiguity warning when using meters
There is an ambiguity when trying to enter units of meters. Ordinarily, in standard SI convention, meters are shown in a lower case m. However this is the same letter used to represent the milli metric prefix in our products. If, for example, you type “42 m”, do you mean 42 milli, or 42 meters? For a Unit Var Field representing a variable of type meters, the program can’t tell. Even if we represented meters with an upper case M, we’d still have a problem, for upper case M also represents the metric prefix Mega.
So what to do? There are two options: (1) Spell out meters in full, such as typing “42 meters”. (2) Use the combo box and select the meters entry that way. That’s probably the easiest solution.
NOTE 1: You don’t need to put a space between the metric prefix and the unit type. The program can handle either form. For example, both “milli meter” and “millimeter” will work.
NOTE 2: If you combine a metric prefix along with the meters unit type, there is no ambiguity. For example, you can say “mm” and “km”, and so forth. It’s only when you wish to use “m” by itself to represent meters that you run into a problem. A “m” by itself is always interpreted as “milli”.
2.1 Auto exponent conversion
When entering a number, you can type in an optional sign, a decimal point, and a tens exponent. The tens exponent is then automatically converted into metric form (if possible). The following figure shows an example of using a tens exponent instead of specifying a metric prefix:
Figure 6. Auto-conversion of tens exponent into metric prefix form: (a) Before, and (b) after.
You’ll notice from the figure that the program automatically changes the unit scaling prefix to a new value, from Farads to pico-Farads. It does conversions like this for all Unit Var Fields (and Equation Var Fields, as you’ll see later.) There is complex logic behind the scenes that determines which scaling prefix to show. Basically, the closest metric prefix is chosen that allows the main part of the number — the part shown in the text box — to have an absolute value between 0 and 1000 (but not including 1000.) This notation is sometimes referred to as engineering notation, and is reminiscent of what you might find on a scientific calculator.
2.2 Handling Metrix Exponent Overflow
If the number can’t be expressed appropriately because it is too large or too small for the largest or smallest metric prefixes supported (Peta to femto), then the program still presents the number with engineering notation, but uses a tens exponent instead of a metric prefix, and that tens exponent is placed in the text box as opposed the units combo box. For example:
Figure 7. Parsing a really small number (a) before, and (b) after.
Sidebar: Hidden Exponent Warning
There is a corner case that must be discussed. What happens if the number is very large or small, and the tens-exponent is used, but it comes after lots of digits such that it is hidden beyond the right side of the text box? In this case, because the exponent is hidden, an unsuspecting user might be very misled into thinking the number has no exponent at all, when that is decidedly not the case, especially for very large or small numbers.
To signal this to the user, the program puts the characters “[!]” at the beginning of the number, to signify that there are more digits to the right that need to be inspected. Here’s an example:
![]()
In this case, the number is actually 192.874984796392E-30. You can see this while in the edit box by pressing the End key, which will cause the text box to scroll all the way to the right, exposing the exponent:
![]()
Should you hit the Enter key while in a field with hidden exponents, (or press Solve as you’ll see later), the special edit field parser ignores the warning characters. They aren’t officially part of the number.
2.3 Honoring the decimal point
Even though Unit Var Fields will in general auto-convert the numbers you enter in engineering notation, they try to leave what you typed intact, as long as there aren’t too many digits to the left of the decimal point, or too many leading zeros to the right. Here are two examples involving leading zeros:

Figure 8. (a) Entering a number with leading zeros to the right of the decimal point. (b) After pressing Enter. (c) Entering more than 5 leading zeros. (d) After pressing enter.
The examples given in (a) and (b) show how what you type can be honored: The two leading zeros of the number are left intact, and the “pF” text is stripped off, which then shows up in the combo box selection, as shown in (b).
Why do this? A datasheet or circuit diagram might express the capacitance value as “0.0047 pF”, and it’s less cognitive load on you, the user, in seeing that same decimal notation kept in your program.
Unit Var Fields don’t always honor the form you type in. If the number has more than five leading zeros after the decimal point, that number will be converted into engineering notation if possible, or if the number is too large or too small, the program will revert to using a tens exponent. An example is given in (c) and (d) of Figure 8.
Why not keep all those leading zeros? Because it becomes too hard to figure out what number you are actually entering. You have to count the zeros, which leads to more cognitive burden.
Figure 9 below illustrates another way the decimal point is honored — or not. Here, we’ve got lots of digits to the left of the decimal point. In the coupled example (a) and (b) those digits are left alone after entry. But in (c) and (d), there are more than six digits before the decimal point in (c). It’s hard to count that many by eye, so the number is automatically converted to engineering notation in (d), with the decimal point being moved in the process and the metric prefix updated.

Figure 9. (a) Entering a number with less than six digits to the left of the decimal. (b) The number is preserved as is. (c) Entering more than six digits to the left of the decimal. (d) The number is converted into engineering notation.
Even if the program preserves the way you typed in a number, the information may not stay that way. If the value gets recomputed by the program, it will always be shown in engineering notation. If you change the scaling using the combo box in a special mode called unit tracking mode (explained next), then the value will be converted back into engineering notation.
2.4 Units Tracking
When you do selections with the units combo box, you are telling the program to change the number to have the new scaling prefix and/or units. This causes the underlying value — the value used in calculations — to change. For example, changing the units from F to pF means you are making the underlying value 12 orders of magnitude smaller.
There’s another mode for selecting units in which the underlying value does not change, but merely the way it is displayed. This is called the Units Tracking Mode. You access this mode by either (1) pressing one of the shift keys while simultaneously clicking the combo box with the left mouse button to make a selection, or (2) by using the right mouse button by itself, (no shift key needed.) Figure 10 shows an example:
Figure 10. (a) Pressing the shift key while clicking on the combo box to select new units to show. (b) The result after the displayed value is made to track the new units. The underlying number does not change — only the way it is displayed.
We start with 0.042 uF, and by using a shift-key / left mouse-click combination (either shift key works), or by using a right mouse-click, we can select nF and cause the displayed form to change to 42 nF. The actual value doesn’t change, only the way it is shown on the screen. Note that both 0.042 uF and 42 nF represent \(\displaystyle 42\times {{10}^{-9}}\) Farads.
The Units Tracking Mode is another way to help relieve cognitive burden. It’s easy to understand what 42 nF means — it only takes the mental conversion from nano to powers of ten to know that our number is really \(\displaystyle 42\times {{10}^{-9}}\) Farads. With a displayed text of 0.042 uF, you have to mentally shift the decimal point and then apply the uF units.
2.5 Parsing Errors
A custom parser is used to process the text you type in and make sense of it. If you make a typo and enter invalid characters (such as those not part of a number), or type in a prefix or unit type the program doesn’t understand, a message will pop up underneath the text box, outlined in red, which explains the error. Figure 11 illustrates:

Figure 11. Parsing error popup window.
In this example, the user has typed in “56.23dog”. The program parses the number to be “56.23” and then attempts to match the non-digit characters “dog” to valid units. In this case, the units named “dog” are unknown. Thus, after the user presses Enter, all invalid characters on the right are stripped out of the text box, and the popup error box is displayed. The popup shows all the characters that were entered, and points to the first offending character by using a caret “^” symbol on the following line, along with the error message.
The popup can subsequently be hidden by clicking on any field on the current form, including the current field. You should understand that the digits remaining in the text box constitute a valid number — just perhaps not the number you wanted. The keyboard focus is automatically set to the text box, where the intention is for you to fix the entry.
WARNING: If after a parsing error you leave the entry as is, then the number shown will become the new number for the field, rightly or wrongly. Be sure to heed the error message and take corrective action.
2.6 Ratio Variables
Most of the Unit Var Fields involve units where metric prefixes make sense. In these cases, you aren’t able to change the unit type, but rather, the scaling prefix. There are cases where this does not apply: When entering fields that represent ratios, which technically have no units at all. You are allowed to enter ratios using either a linear multiplier, a logarithmic form using decibels (dB), or by couching the ratio in terms of percentage. The underlying unit type is “ratio” in all these cases. You are merely changing the way the value is displayed. Metric prefixes do not make sense here, and are not used.
The most common Unit Var Field of this type is one that allows you to enter a ratio either in linear mode or logarithmic mode. We call this a Ratio Var Field. You select which by using “X” for linear, and “dB” for logarithmic. Figure 12 shows these two cases for a field that represents loop gain:

Figure 12. Shift-clicking in a ratio var field/units combo box to go from (a) decibel units to (b) a linear multiplier.
The same display / underlying value semantics are used here as for any other Unit Var Field. Selecting from the combo box with left-mouse button changes the meaning of the underlying value to use whatever ratio type was picked. Using shift-click, or right-mouse click by itself engages the unit tracking mode, and only the displayed text changes, not the underlying value. In Figure 10, the displayed text is changed from 40 dB to 100 X, but in both cases, the underlying ratio is still 100.
For some types of fields, you are allowed to choose from either a straight multiplier (“X”) and percentage (“%”). In the latter case, a division by 100 is implied.
3.0 Equation Var Fields and Equation Worksheets
A feature unique to Robust Circuit Design products is the support for Equation Worksheets. These are GUI constructs that allow you to solve for target variables in one or more equations making up a worksheet. Suppose there is a worksheet representing the well-known equation V = I R. We can implement this using three fields a special type called Equation Var Fields. These fields are an extended form of Unit Var Fields that have an icon to the left of the text box that indicates the dependency status of that field. Figure 13 shows an example:
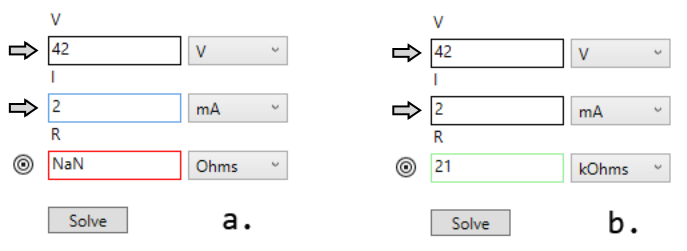
Figure 13. (a) Setting up to solve for R, in the equation V = I R. (b) After pressing the Solve button.
The fields are classified into two main types: independent variables and dependent variables. The independent variables are indicated using an arrow, and they represent fields whose values are to be typed in by the user, and then used in solving the underlying equation(s). We sometimes call these fields arrow fields. In our example, V and I are the arrow fields — the independent variables.
Dependent variables are indicated using a target icon, and represent the targets of the solution. These are not directly edited by the user. Instead, their values are computed when the equation(s) is(are) solved. We sometimes call these fields target fields. Here, R is the target field, and when the Solve button is pressed, R is solved for in terms of V and I, using an inverted form of the V = I R equation. Figure 13 (b) shows the result.
Tip #1: Instead of pressing the Solve button, you may optionally just press Enter after typing into one of the arrow fields. Pressing Enter in this case has the same effect as pressing Solve.
Tip #2: Whenever Solve or Apply buttons are presented to you in the GUI, it behooves you to use them (or to press Enter in an input field when ready to solve). While the program automatically tries to calculate any pending solution(s) when needed — like when a master Update button is pressed, for example, it’s good practice to invoke the solving manually — especially when first learning to use the program. That way you can double-check the results to see if they are what you were expecting, before moving on to some other part of the program. You’ll eliminate a lot of mistakes this way.
3.1 Pending Equations
Suppose you don’t press Enter, and also forget to press Solve, and click on some other field or button. In these cases, the equation(s) is(are) left pending and stay unsolved. (There might be a master Update button that can cause them to be solved automatically.) The pending target fields are indicated by having a red-border placed around them as shown in Figure 13 (a). The input field that was last edited is shown nominally with a blue border, such as for the I field of Figure 13 (a).
The red border is an alert to you that you have a pendinq equation to be solved, and that the value in the field is actually invalid. The Solve button should be pressed, (or Enter pressed while in one of the arrow fields). After the equation is solved, the border color of the target will change to green. Figure 13 (b) shows the result of pressing Solve, with the border color of the target field changing from red to green indicating the field has been solved.
NOTE: Don’t completely rely on the colored status of the fields. Due to unavoidable GUI interactions and/or timing issues, a blue border may revert to black, perhaps quickly enough that you don’t see it as ever having been blue. A similar thing may occur for red borders. A pending target field may get a blue border if you happen to click into it at the right time. And ditto for green borders. When in doubt, click Solve. SCE does its computations quickly, so there there’s not much harm in re-solving the equations even if not needed.
3.2 Changing Targets in Reversible Equation Worksheets
The target of an equation worksheet is not always fixed. In many worksheets you are allowed to change which field becomes the target of the equation. Effectively, you can invert the underlying equation from the form implied by the ordering in the GUI. This was the case in Figure 13, where instead of solving for V in V = I R — which is implied by the vertical ordering of the fields — we solved for R.
The arrow/target icons are actually buttons that can toggle between arrow and target. To change targets, click the arrow icon of one of the arrow fields. That arrow field becomes the target field, and the former target field becomes an arrow field. Figure 14 shows the three possible arrow/target configurations for our sample worksheet:

Figure 14. The three configurations of a three-variable equation worksheet.
Instead of clicking an arrow icon to convert it to a target you can also do the opposite: Click a target icon to convert to an arrow. However, toggling the icons this way is a bit more complicated, because one of the other fields must now become the new target. The question is, which one?
The following rule is used to determine the new target: The field below the former target becomes the new target. When the bottom of the set of fields is reached, the target location wraps around to the top. Figure 15 illustrates this behavior: (a) Represents an initial configuration, (b) shows the configuration after clicking on the target in (a). Note how the next field down becomes the new target. (c) Clicking the new target again causes the bottom field to get target status. Clicking that new target then wraps the target location to the top.

Figure 15. (a) Initial configuration. (b, c, d) After subsequently clicking the target icon, causing the target location to move. Now how it eventually wraps around to the top.
SIDEBAR: This target movement seems confusing. Why doesn’t the program just do what I want?
The answer lies in the question. There is no way for the program to know your intentions. Ultimately, you have to choose which field becomes the target. If the field is currently an arrow, that choice is easy and direct: Just click on the icon to toggle it. Often though, the reverse is the situation: You have a field that’s a target, and you’d like to change it to an arrow so you can enter a new value for it. The problem is, some other field now has to become the target. How is the program to know what that should be? So the worksheet chooses to make the field below the current one the target.
If this gets confusing, try thinking not about what field you want to change, but what field you want to allow to be calculated. If that field is not already a target, make it so by clicking on its icon.
3.3 Target Fields are Read Only
Since target fields are computed, it makes no sense to try and edit their values. If you try, you’ll be greeted with a popup warning, as shown in Figure 16.
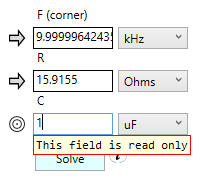
Figure 16. Error box that pops up if you try and edit a target field.
If you want to manually change a target’s value, (as opposed to having its value calculated), you must toggle it to become an arrow (if you can).
3.4 Units Tracking with Target Fields
Even though you can’t edit a target field, you can select a new metric prefix by using the Units Tracking Mode. As with with normal fields, you can initiate this mode by pressing either the shift key while left-clicking on the units combo box, or by using a right-click by itself. But unlike normal fields, pressing said shift key is optional. Merely selecting a new prefix in the combo box with either mouse button will cause the units to track. In other words, target fields always have the Units Tracking Mode engaged. Figure 17 shows an example of using either a left or right mouse click to select the units of Ohms for our previous example. Note that changing the displayed text in no way changes the underlying value. 21 kOhms is the same as 21000 Ohms.
Figure 17. Selecting new units for a target field using tracking mode. (a) Before, (b) after.
3.5 Solve Button Information
In many worksheets used in our products, you’ll see a small circular Info button placed directly to the right of the Solve button. If you hover your mouse over this button, a small window pops up. This window provides information about the equations being solved by the worksheet. Figure 18 shows an example:
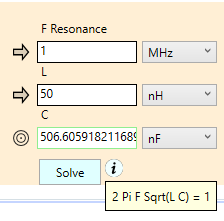
Figure 18. Info Button popup
Here, the equation worksheet is solving the resonance formula for a LC network. Note that the equation is shown in a normalized form that may or may not represent the inversion of the equation as implied by the status of the field icons. You’ll have to mentally do this inversion if you want to know precisely what’s being calculated by the Solve button. Hey, we can’t do everything for you. 🙂
In any case, such info popups can be quite valuable, especially if there is more than one equation being solved by the worksheet (which you’ll see next.) You can easily check to see just how the targets are computed. And not only that, those equations may be a learning opportunity for you. You might learn circuit equations that you weren’t aware of (or have forgotten.)
4.0 Multi-Equation Worksheets
While many equation worksheets work with just the variables of a single equation, it’s possible to have worksheets involving two or more equations. These equations might all be covered with just one worksheet, or by two or more worksheets coupled together.
4.1 Single Arrow Multi-Equation Reversible Worksheets.
The simplest kind of multi-equation worksheet involves having all fields being targets, except one. From the single arrow field, all other fields are computed. In many cases, the equations are reversible such that any of the fields can serve as the arrow field, with the rest becoming targets. Figure 19 shows an example, borrowed from the Signal Definition Dialog of Signal Wave Explorer:
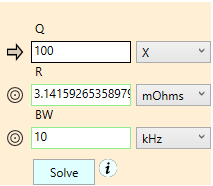
Figure 19. Reversible multi-equation worksheet with one arrow field.
While this worksheet looks simple, it actually incorporates two equations for computing “Q” of a resonant LRC low pass filter. The formulas in question are:
\(\displaystyle Q=\frac{{\sqrt{{{L}/{C}\;}}}}{R}\),
\(\displaystyle BW=F/Q\)
Note that the variables L, C, and F come from another worksheet and are treated as constants here. Let’s see what happens when we select each of the three fields Q, R, and BW as the arrow field in turn.
| Arrow Field | Eqn 1 | Eqn 2 |
| Q | \(\displaystyle R=\frac{{\sqrt{{{L}/{C}\;}}}}{Q}\) | \(\displaystyle BW=F/Q\) |
| R | \(\displaystyle Q=\frac{{\sqrt{{{L}/{C}\;}}}}{R}\) | \(\displaystyle BW=F/Q\) |
| BW | \(\displaystyle Q=F/BW\) | \(\displaystyle R=\frac{{\sqrt{{{L}/{C}\;}}}}{Q}\) |
It’s hard to keep all these inversions straight. That’s the value of the reversible worksheets.
4.2 Non-reversible Targets in Multi-Equation Worksheets
Sometimes you’ll have multiple equations represented by a single worksheet with multiple arrow fields and multiple target fields. Figure 20 (a) shows an example taken from the Generic A/D Converter Stage Definition in Signal Chain Explorer. In such a worksheet, we currently do not support the underlying simultaneous equations being reversible. That is, neither the targets or arrows in these worksheets can change status. Such fields are called non-reversible fields. The following icons are used to indicate such fields: (1) Non-reversible targets are shown with hollowed out target icons, instead of filled, with no center bulls-eye. Non-reversible arrow fields are indicated by hollowed out arrow symbols. If you click on a hollowed-out icon, nothing happens, for the field cannot change state.
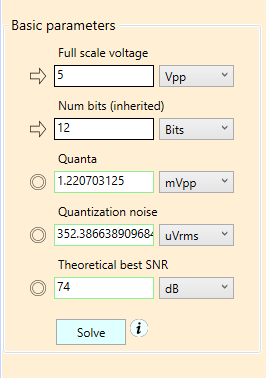
Figure 20 (a). Worksheet with all non-reversible fields.
Three equations are represented by the three non-reversible fields in the figure above:
- Voltage quanta: \(\displaystyle Quanta=\frac{{FullScale}}{{{{2}^{{NumBits}}}}}\)
- Quantization noise: \(\displaystyle \text{Quantization Noise}=\frac{{Quanta}}{{\sqrt{{12}}}}\)
- Theoretical Best SNR: \(\displaystyle SNR=6.02\times NumBits+1.76\)
All three equations are solved when the Solve button is pressed, and the target fields are updated.
Figure 20 (b) shows a more complicated beast, with both reversible and non-reversible fields in the same worksheet. Notice the difference between the reversible arrows and the hollowed out non-reversible arrows. Likewise with the reversible vs non-reversible targets.
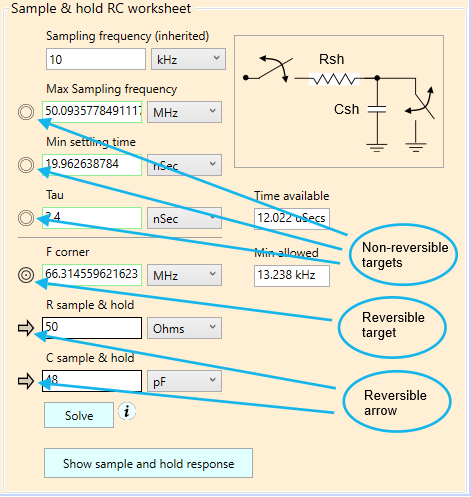
Figure 20 (b). Worksheet with mixed fields.
Mixed equations like the one above are the subject of the next section. But we’ll note in passing that the worksheet above is partitioned into two sections: Those with non-reversible fields, and those that are reversible. The “target location wrap-around” ordering applies to the bottom section, should you repeatedly toggle whatever the current target icon is. Many of the complex worksheets are arranged this way.
TIP: Just because a field is marked non-reversible doesn’t meant it’s not editable. For example, with a non-reversible arrow field, you can still change its value, in fact, it’s intended that you do. What you can’t do is change its status from arrow (independent) to target (dependent.)
4.3 Mixed Field Equation Worksheets
The mixed field worksheet of the last section is a bit complicated to explain, so we’ll use a simpler example to illustrate how these types of worksheets operate. Figure 21 shows an expanded version of our earlier “Q” worksheet, with a new added “T” field, which represents the time constant of the circuit:
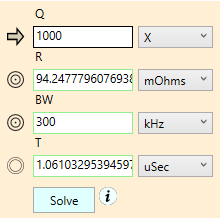
Figure 21. Expanded “Q” worksheet that includes a non-reversible Tau field.
The computation required to compute Tau is a bit complicated, and involves variables from other worksheets not shown. The underlying equations for Tau are not easily inverted. So we made T (for Tau, not Texas) a non-reversible target, indicated once again by it’s hollow target icon. The other three variables, Q, R, BW, are reversible, as before.
In this mixed field worksheet, should you toggle the reversible field icons, the rotation of the new target icon cycles through the top three fields, ignoring the non-reversible field.
4.4 Coupled Worksheets with Highway Lane Markers
Sometimes in makes sense to couple two or more worksheets together. Our “Q” worksheet of the previous section is in fact part of a triplet of worksheets for computing the parameters of an LRC low-pass filter. Figure 22 shows the coupled worksheets in their full glory:

Figure 22. Coupled worksheets. Note the highway lane markers that suggest the operational flow of the worksheets.
The “F” worksheet calculates the resonant frequency of the circuit, using the equation:
\(\displaystyle 2\pi F\sqrt{{{L}/{C}\;}}=1\)
which is completely reversible.
The coupled worksheets are meant to be used in a particular order: The “F” worksheet is to be solved, then the “Q” worksheet is solved. The “Q” worksheet uses variables from the “F” worksheet, but treats those variables as constants. Note though that the “Q” worksheet has no effect on the “F” worksheet. It’s a one-way street.
To indicate this dependency order, a dotted-solid vertical pair of lines separates the two worksheets, reminiscent of the passing lane markings on a highway. In our case, the dashed line on the left and the solid line on the right, combine to indicate a flow from left to right.
The third, rightmost worksheet has all non-reversible targets, and uses values from the other two worksheets. Because the rightmost worksheet has no effect on the other worksheets, we once again have used highway lane markers to indicate this dependency order. As targets, all of the fields in the third worksheet are computed any time either of the Solve buttons in the other two worksheets are pressed. You can’t edit these fields, of course, since like all targets they are read-only. You can, however, use unit-tracking on those fields to change what metric prefixes are displayed.
5.0 Wrapping Up
Well, is your head spinning by now?
No doubt, using the Unit Var Fields and Equation Var Fields and Equation Worksheets may seem a bit daunting. There’s a lot of power and subtlety built-in to these GUI elements, but they are designed, believe it or not, to aid in your signal chain explorations easier, by allowing you to focus on the big picture — “the design space”, making it convenient to change parameters and then solve for other, dependent parameters, without having to get your calculator out, or worse, having to remember the relevant equations. The units combo box working in concert with single letter prefixes typed in the edit fields makes quick work of changing component values for circuit components like resistors, capacitors, inductors. The units tracking feature helps you make sense of the magnitudes of the values, and if you are unfamiliar with metric prefixes, you’ll quickly get up to speed just by using this one feature alone.
We’ve strived to make editing values in our products easy and intuitive, yet still retain a lot of power. We’re sure you’ll quickly get the hang of these unique features, and will grow to appreciate the time and mental burden they can save.
Comments
Using Unit and Equation Var Fields — No Comments
HTML tags allowed in your comment: <a href="" title=""> <abbr title=""> <acronym title=""> <b> <blockquote cite=""> <cite> <code> <del datetime=""> <em> <i> <q cite=""> <s> <strike> <strong>